Here is a simple way to create small tillable background images for your web pages using Photoshop and ImageReady.
This tutorial assumes you are using Adobe Creative Suite and the fonts bundled with it.
-
For those not using the Creative Suite, substitute D below with an ornate dingbat font from your collection and ignore ‘Ornaments’ step that immediately follows.
A. Create a new document. Your preference choice. (The final output will be small, anyway’s)
B. Set your foreground Color, your preference (I used #F4F8F1), & create a Solid Fill layer based on this color.
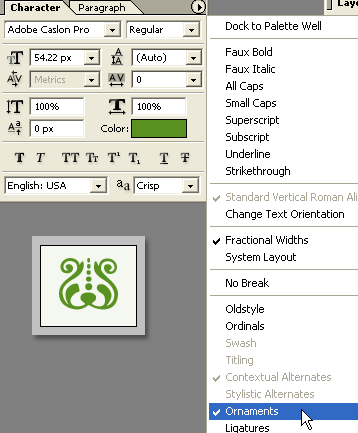
C. Select the Type Tool from the Tool Bar. Go ‘Window/Character to bring the Character Palette to the foreground.
D. Within the Character Palette browse to the ‘Adobe Caslon Pro’ Font and set your desired settings. (I used font color of #5A9221.)
E. With the Type Tool active create a new type layer and use the letter ‘v’. (As captured below)
-
Next, from the Character Palette menu options select the Open Type ligature feature called ‘Ornaments’. And the standard ‘v’ is converted into the symbol I have captured below.
-
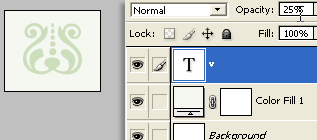
Next, lower the Opacity of this Type Layer to a reasonable integer. I used 25%. (Ultimately, you don’t want your background to be glaring to your viewers.)
-
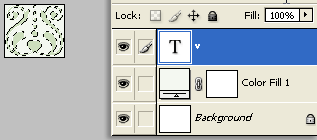
Next, Ctrl/Command + Click on the Type Layer to select its pixel content, then go ‘Image/Crop’ to eliminate the surrounding unwanted areas as I have captured below.
-
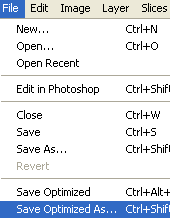
Thats it for the Photoshop portion, next hit the ‘Edit in ImageReady’ button located on the Toolbar.

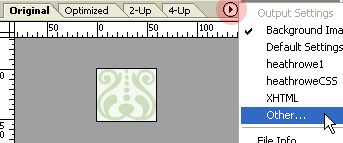
Once in ImageReady, select the Output menu option (encircled in Red) and from the list choose the ‘Other’ feature, as I have captured below.
Once in the Output dialog, hit the ‘Next’ command until you reach the Background settings.
Tick the View Document as ‘Background’, then OK to commit the Output settings.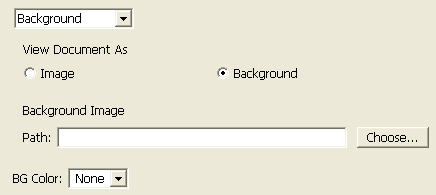
Finally, go ‘File/Save Optimized As’ as captured below.
Set the following options as captured.
Unique filename.
Save Type both .html & Images.
Choose the ‘Custom’ settings created earlier.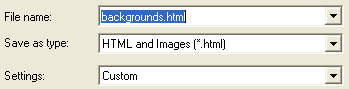
View the final output of this tutorial here.
Here is a smaller version of the tiled background.
Plenty of room for possibilities here.
Click the below thumbnails for variations.


