As noted in the previous lesson, the premise of creating these animations as compact as possible relies solely on Vector shapes within Photoshop or ImageReady.
These include Text Layers and Shape Layers (with Vector Mask).
Ultimately, the trick here is to avoid using Layer Masks, Layer Styles or Bitmap images to make the file size as small as possible.
Another thing to note, ImageReady animations is LAYER Based. Though for .gif animation output, toggling LAYER SETS during tweening work perfectly fine. However, LAYER SETS do not translate into smooth transitions for Flash output and therefore you have to toggle all (individual) layers.
Follow along with this simple example.
Below are the additional vector components of this animation.
Screen capture 1 shows the custom vector ‘PSCS2Icon’ Layer Set elements and screen 2 shows a custom vector ‘PSCS2Suite’ Layer Set elements.


Download the zipped base psd file to continue with the rest of the animation.
-
Open the above flash2.psd file in Photoshop, Jump to ImageReady and begin the rest of the animation below.
Note all the Vector Layers, and plenty of them.
To begin, lets add two new frames to the animation window.
Frame 6
1. Activate the Last Frame. (Frame 5)
2. Hit the Duplicate Current Frame Icon
3. To produce the new frame. (Frame 6)For Frame 6
1. Expand ‘PSCS2Icon’ Layer Set. (Frame 6)
2. Toggle visibility to ON for all the sub set layers for ‘PSCS2Icon’ Layer Set.
3. You should now see its contents visible in the Frame 6 of the animation window.Frame 7
1. Activate the Last Frame 6, hit the Duplicate Current Frame Icon to create Frame 7.
Turn off all sub set layers under ‘PSCS2Icon’ Layer Set.
2. Expand ‘PSCSsUITE’ Layer Set and turn ON all sub set layers to see its contents in Frame 7 of the Animation Palette.This is what the Animation Palette should look like.

-
Tweening
1. Activate Frame 6
2. Hit the Tween Icon on the bottom of the Animation Palette.
3. Adjust the settings as captured below. (Previous Frame/3/Opacity)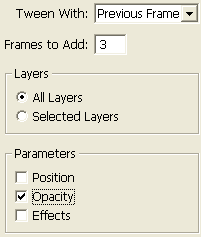
Then:
1. Activate the Last Frame (10)
2. Hit the Tween Icon on the bottom of the Animation Palette.
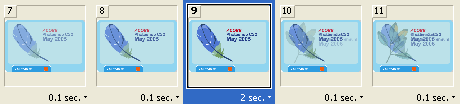
3. Use the same settings as captured above. (Previous Frame/3/Opacity)Select Frame 9 and alter the Playback control from 0.1 sec to 2sec as I have captured below.
-
Save As Gif
Select Frame 1, go ‘File/Save Optimized As’ flash2.gif to save it as an animated gif.
Remarkably, this animation now clocks in at 92 kb. (Note: My .gif has an additional tween from the last to first frame and is set to Forever)
Still not too bad for all the additional layers added. -
Export As Flash
Select Frame 1 again, go ‘File/Export/Macromedia Flash Swf…’ and set the following options.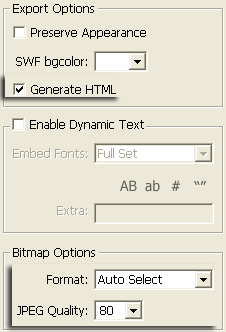
The below Flash output is now 16 kb, far less than half the original.
Smooth Vector ImageReady Flash Animations (Part Three)
Completes the animation by adding hotlinks through Image Maps.Summary:
1. Prepare Vector based elements before you begin the animation process.
2. Avoid Layer Masks, Layer Styles and Bitmap’s where possible to minimize file size.
3. Tween – Only use the Parameter’s where necessary. IE – I only needed to use ‘Position’.
4. Export as Swf – disable the Preserve Appearance feature when just using Vector shapes.