Here is a few simple things to watch out for when using ‘Slices’ for your web designs/layouts.
Click here to Preview the Mock Layout.
-
Organization and Naming Conventions
The above is an example of a single page layout.
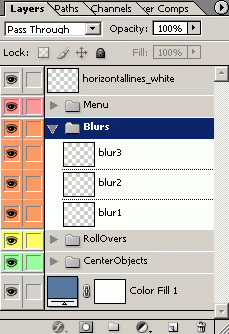
Iv’e got all my layers organized into Folders for easy management. And i also have them properly named so that I can easily find them.The naming also helps in the final stage of slicing. Any future changes of any particular layer will have to be considered in the final html page, because Photoshop/ImageReady automatically generates the proper javascript as you specify with your slices.
You can also ‘Color Code’ each ‘Layer’ for further organization, by simply right clicking (Mac: Shift Click) on a ‘Layer’ (or ‘Layer Set’) and choose a ‘Color’ from the ‘Layer Properties’ dialog. (Color coding a set automatically sets the color code to the Layers within that set.)
-
Preflight
The thing to realize about slicing a layout, is determining how you want to display your web layouts’ contents. Particularly, when templating your design (header area, content area, footer area) its crucial to determine the exact ‘Rows and Columns’ in relation to a ‘Table’. (This is usually and often decided at the storyboard or planning stage of your site design.)
In simple web talk, a ‘Table’ (<table></table>) consists of table data (<td></td>), positioned in table rows (<tr></tr>).
The entire Photoshop Document represents a single Table, and a ‘Slice’ in Photoshop equates to an individual table data element (or Column) within a table row.As you can see, in the below link, this document (when ‘Saved for the Web’) will create a single ‘Table’ (the entire width of the document) with three Rows, and two Columns in each Row.
Click here to Preview the ‘Sliced’ Mock Layout. -
Depending on the complexity of your design positioning your Slices wisely could maximize your pages’ load time.
First, hit ‘Ctrl + R’ (key) to make the Horizontal & Vertical Rulers visible. (Alternately – ‘View (menu option)/Rulers’)

Then, go back to ‘View’ (menu option) and Select ‘Extras’ — This allows you to toggle between any Slices and or (Ruler) Guides on your screen.
Go to ‘View’ (menu option) again & Select ‘Snap’. This will allow for easy click and drag of slices to Snap directly onto your guide. (If you have any laid out?)
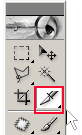
With the preliminary preparations out of the way, and you’ve decided where to lay out your guides, then choose the ‘Slice Tool’ on the ‘Toolbar’.
Click and Drag your first Slice starting at the upper/left portion of your design until you feel it ‘Snap’ to your (in my case) center guide. Photoshop automatically numbers your ‘Slices’ in succession.

Sweep across your design until it’s completly Sliced. Any areas you do not slice, Photoshop will Auto-Slice it for you.*** In my case above I,ve Sliced it into a Grid. Two Columns, three Rows. Row One and Row Three are solid colors, so in the final stage I can eliminate these images & replace them with the appropraite html color (in this case — #5779A0) code.
-
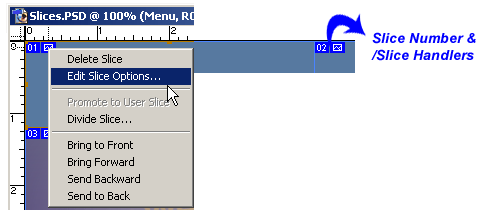
With the Slice tool still active
 (Pressed on the toolbar), mouse over the ‘Slice Number & / Slice Handlers’ (as captured below), then right mouse click choose ‘Edit Slice Options…’.
-
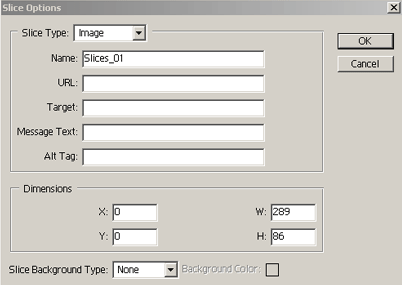
The Slice Options dialog box appears. Here’s a quick run down on the options.
Name = image file name
Url = link **
Target = same/new window **
Message Text = Status Bar Text Message**
Alt Tag = Image ToolTip Message **** = Optional
If this slice were a Menu button, then it would be appropriate to have the Name the same as the Menu (example, Guestbook), and the Optional items i would fill in so they will be already complete in the final .html file.)
Fill in your appropriate options and then click OK.
-
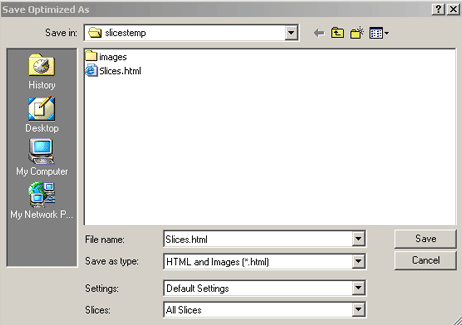
Now go to ‘File/ Save for the Web…’, and you’ll see the ‘Save for the Web’ dialog box. Choose you optimized Settings on the right side of the panel, then Click ‘Save’…..
You’ll be prompted to ‘Save Optimized As’ to a location on your computer.Notice the File name: by default, Photoshop automatically names it to the default name of my .psd file name.
Select the ‘Save As Type/Settings/Slices’ options as I have captured below.