Here are a few ways to create rounded/cornered graphic panels in Photoshop.
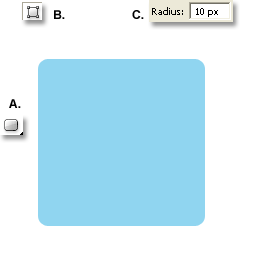
Rounded Rectangle Tool (U)
The easiest method is found in the ‘Rounded Rectangle Tool (U)’ on the Toolbar.
Set your desired Foreground Color.
-
Option One
- Activate the Rounded Rectangle Tool (U)
- Go to the Options Bar and activate the Shape Layers option
- Then to the mid-right of the Options Bar set the Radius integer. This controls the radius of the corners. Explore with other integers for the effect that best suits your design.
-
Option Two: Multiplier Keys
Another method is to use the multiplier Options located on the Options Bar for an active Vector Shape.Set your desired Foreground Color.
- Activate the Ellipse Tool (U
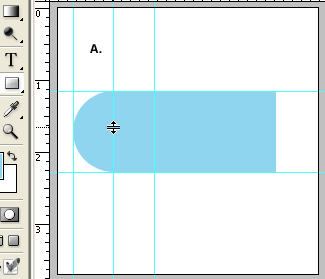
- Drag & Draw an Ellipse.
- Ctrl/Command+R to enable Rulers & Drag Horizontal/Vertical Guides to the Bounding edges. More importantly to the center of the object.
- Switch to the Rectangle Tool (U).
- Activate the ‘Add’ modifier for the active shape.
- Snap to the center Guide and drag to draw outward snapping to the top & bottom guides as you draw.
-
Deselect the shape
Ctrl/Command + H to hide the Guides to preview the new shape.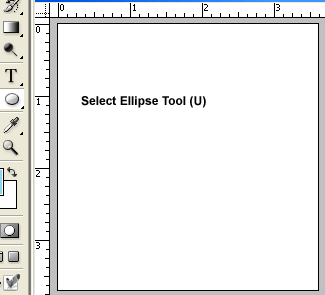
-
Option Three: To build on the above shape.
- Mouse over the mid Guide.
- Hold the Ctrl/Command + Alt/Option keys, then Click once. Vetical Guide becomes Horizontal Guide.
- With Rectangle Tool (U) still active, drag & draw downward to snap to the left/right Vertical Guides.
- Switch to the Rectangle Tool (U).
- Deselect the shape
-
Ctrl/Command+H to hide the Guides to preview the new shape.
-
Option Four: Pen Tool (P)/Paths
Another method is to use the Pen Tool (P) with Options Bar Shape Layers enabled.
Set your desired Foreground Color.
Ctrl/Command + ‘ to enable the Grid. Enable ‘View/Snap’.As below a simple Click (to Add Anchor Point) followed by Click & Drag (to Add & Convert Anchor Point) snapping to a desired grid line creates smooth curved shapes.
