Using Photoshop CS, here is a simple tutorial on how to create a note paper effect.
Note: For users of version 6/7, download the .pat (Pattern file) here. Then instead of the ‘Color Paper’ Pattern Overlay preset selection indicated below, choose ‘Load Patterns…’ from the list.
Start a new document of your preset choice. (I used 500×500)
Create a new Layer.
Select the ‘Rectangle Tool (U)’ ![]() from the toolbar. with ‘Shape Layers’ option bar active
from the toolbar. with ‘Shape Layers’ option bar active ![]() .
.
Click and drag to draw your note paper shape. (I used a foreground color of #999494, but this will change later)

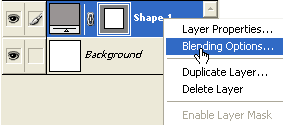
Next right-click and choose Blending Options on the Shape Layer, as captured below.
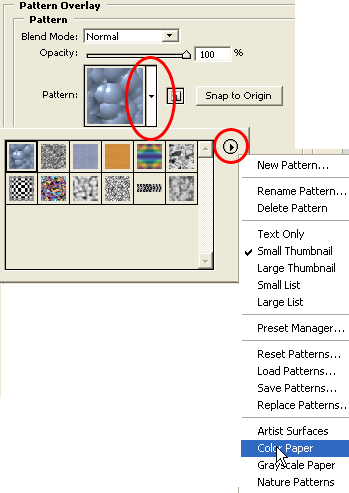
Then go straight to the ‘Pattern Overlay’ panel, Select the Pattern Preset drop option button (large red circle below), then from within the default Pattern Preset, select its menu option (small red circle below), and from within the preset list select ‘Color Paper’.
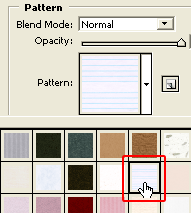
Next from within the ‘Color Paper’ preset select the ‘Notebook’ preset, as I have outlined in red below, and this will update both the ‘Pattern Overlay’ preset selection as well as the main document.
Here is the updated document preview, below.

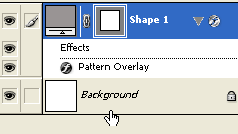
Here is how the Layers Palette should appear at this point.
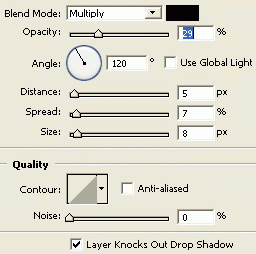
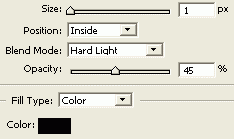
Next add simple additional layer styles like Drop Shadow, Color Overlay for a complete note book effect.
Drop Shadow Settings.
Color Overlay settings.
Stroke Settings.
Here is the final result.

For the adventurous, select the ‘Pen Tool (P)’ and add additional anchor points. Then with the Convert Anchor Point Tool adjust those points to give the paper a touch of style in shape as opposed to a flat shape. As I have captured below.