-
Start by choosing a foreground color for the face color of your ‘Up’ button state.( I used #47759D)
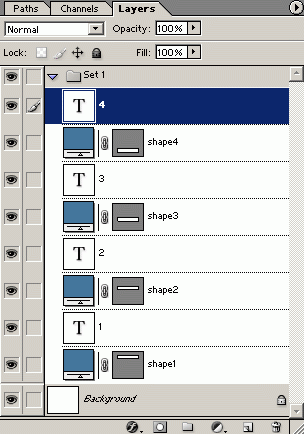
Next, with the Rectangular Shape tool draw four same size separate items as I have captured below and four separate Text (#ffffff) captions for each button.Note: The layer stack order in which they appear is important.
Tip:For same size proportional buttons, lock guides to the left and right of the first button, then switch to the ‘Move Tool (V)’, Ctrl click on that button layer to select it and hold the ‘Shift + Alt’ keys to duplicate one by one as you glide them along the previously made guides.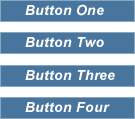
Here’s the Layer Stack Order.
-
Next, slice the individual buttons for ImageReady import.Now there’s a few options and things to consider here before we begin.
‘Slice from Guide’ or ‘Layer Based’! What about the surrounding empty data (white space)?
Decisions you have to make before you bring them into final production.
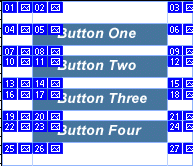
I’ll just deal with the Slice methods for now and move onto the rollovers.Slice from Guide: Position guides around all the ‘Shape1,2,3,4’ elements. (As I have captured below)
Once that is complete, select the ‘Slice Tool (K) from the ToolBar and up on the ‘Options Bar’ choose ‘Slices From Guides’.

That will produce a slice order as below.
Main Benefit of this method: As you can see this option takes care of the surrounding empty data. And this feature is not in ImageReady so this decision is obviously made here first.
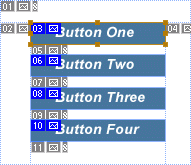
Layer Based Slice: Select ‘Shape1’ layer, and go to ‘Layer/New Layer Based Slice’. Repeat process for the other three shape layers until you have the below.
-
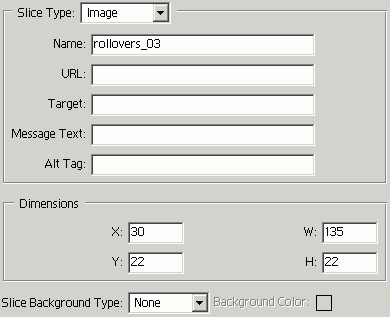
Since this is just a RollOver tutorial I’ve stuck with the ‘Layer Based Slice’ method.Another thing to note and you’ve probably noticed by now, are the Blue Envelope symbols and the corresponding numbers. Well the numbers correspond to the Slice stack order from the top of your document, downward. If you double or right-click on the envelope you can modify other features of this slice that influence your final output.
This feature is available in ImageReady (Window/Slice) so it can be ignored till then or altogether for edit in your favorite html editor.
-
Now, lets switch to ImageReady by pressing ‘Shift+Ctrl+M’ or by pressing the ‘Jump To’ button located at the bottom of the ‘Toolbar’.Preview ImageReady layout. (Note: I’ve closed unneeded panels)
If your RollOvers panel is not visible go to ‘Window/Rollovers’. -
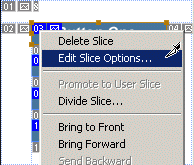
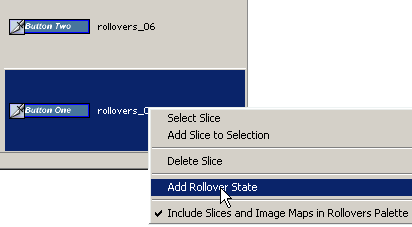
Next, lets add the rollover affects. Start with the first slice thats numbered ’03, right + click and choose ‘Add Rollover State’ from the context menu options. (As I have captured below)
 And here’s what the rollover state looks like.
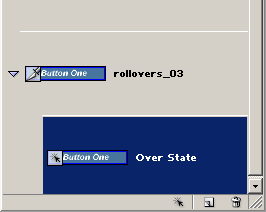
-
Next, with that overstate selected, select the background layer in the Layers Palette that corresponds to that slice, in this case ‘Shape1’.Then right click and choose ‘Layer Style’ and any of the options from the list. (I selected ‘Color Overlay’).
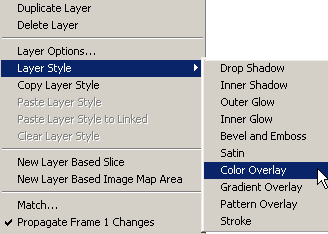
Alternately, select the ‘Add Layer Style’ (f symbol) option at the bottom of the ‘Layers Palette’ and choose Color Overlay from the context list.
-
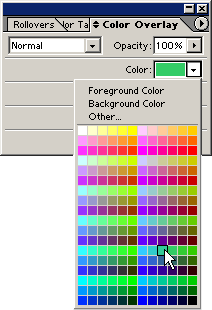
After selecting the ‘Color Overlay’ option, it’s panel opens to a default of Red, but I’ll change mine to a green. (As captured below)
-
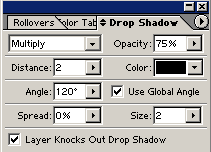
Next, I’ll add a ‘Drop Shadow ‘ affect to the caption ‘Text’ of that button using the same routine. (Still on the Over State of ‘rollovers_03’) Select that text layer that corresponds to the first background layer we just altered. In this case layer labeled ‘1’. As before right-click and choose ‘Layer Styles’ and from the list choose ‘Drop Shadow’. (Below is the capture for the ‘Drop Shadow’ panel. The default ‘Distance’ and ‘Size’ is 5, so I changed them to 2.)
-
A preview of where we are thus far. On Mouse Over event is recorded for the first button as outlined from above procedures.
-
Now lets continue with the rest of the buttons.Instead of having to labour through all those steps individually, here’s a work around.
Add the remaining rollover states (Right click, Add Roll Over State) to the remaining three slices from within the ‘Roll Over Panel’. So that your panel looks like what I have captured below)
-
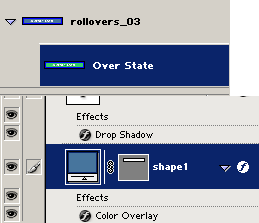
Now have the over state of the first one we did selected, (rollovers_03) and also select the background that layer that corresponds to this rollover (shape1), as I have captured below.
-
Then right click on the background layer that already has the over state style, and from the context menu list choose, ‘Copy Layer Style’. (As I have captured below)

-
Then for each remaining over states that corresponds to that particular slice, right click on that layer choose ‘Paste Layer Style’.Repeat the process for the ‘Drop Shadow’ style from the first step for the others.
-
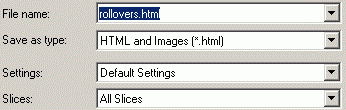
When your ready for export, go to ‘File > Save Optimized As’ (Ctrl+Shift+Alt+s).
-
Then from the Save As options dialogue box set your final output results. (As I have captured)
Here’s how to do image rollovers as quite common with menu items created in Photoshop and then completed in ImageReady for final output.
I’ll begin with four simple Rectangular shapes as the buttons background layer, and four Text items as the buttons caption.