Here is a an explanation to the various types of Layer Palette thumbnail previews, and some general tips on how to use them.
1. A Layer Mask
2. A Vector Mask
3. A combined Layer Mask & Vector Mask.
4. Vector Shaped layer.(Coming Soon)
Well, what does it all mean and how to use them?
In part, Photoshop’s’ most powerful tool IS the use of Layers. You compose your layout or graphic by applying stacks(ie, throughmultiplee layers) of pixel, vector and/or advanced channel information, within layers, one above the other to create your resulting composition. Use of the Toolbar tools combined with varying menu command options, filters & style presets, allow you to further control and fine tune exactly how you want that original layer pixel information (whatever that may be – in my case ‘Layer 1’ below) to appear in your fianl result.
In detail, the remaining purpose of this tutorial is to provide an understanding into using multi-faceted single layer techniques. Like Layer Styles (Stroke, Bevel & Emboss, etc.), simple non-destructive, time saving and document size reduction methods of manipulating a single Layer. Otherwise achieved through the listed items above.
1. Layer Mask
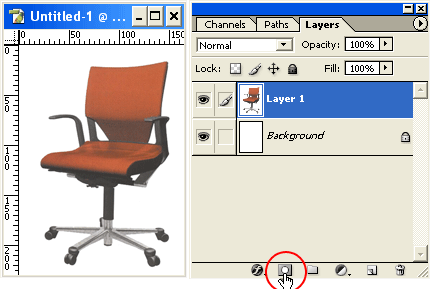
As captured above, the target layer, titled ‘Layer 1’ and highlighted in blue in the Layers Palette, reveals a single thumbnail preview of the exact pixel information of what you see in the main document window.
You apply a Layer Mask to this target layer (Layer 1), by hitting the ‘Add Layer Mask’ button (encircled in red above) located at the bottom of the Layers Palette.
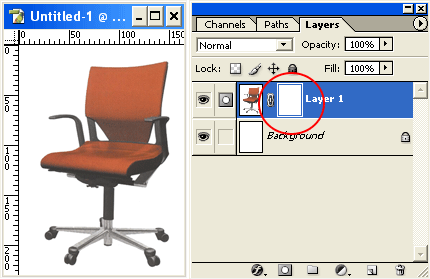
This will add a grayscale (by default) mask ( ![]() linked) thumbnail to the original as captured below. (circled in red)
linked) thumbnail to the original as captured below. (circled in red)
Notes:
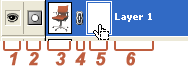
1. The ‘Eye’ ![]() icon indicates (and toggles) visibility mode.
icon indicates (and toggles) visibility mode.
2. Paint Brush icon indicates this layer is the ACTIVE layer. (Also highlighted in a shade of blue.)
3. ‘Layer’ Thumbnail – Thumbnail preview of pixel information on that layer. A single click on it or in any area to the right of the layer ‘title’ (indicated by the white arrow) activates it.
4. The ‘Layer’ and its ‘Mask’ are linked by default & move together in the image when you move either one with the Move tool. Unlinking them lets you move them independently and shift the mask’s boundaries separately from the layer.
5. ‘Layer Mask’ Thumbnail – A grayscale mask used to hide/reveal areas of the attached ‘Layer’ thumbnail (2)
6. ‘Layer Title’ or caption – double click the word to alter its title.

Clicking on the ‘Layer Mask’ Thumbnail (item 5) will allow you to edit (Paint) and move (pending link) it at will.
Notice when you select the ‘Layer Mask’ Thumbnail, the above Paint Brush icon (Item 2) reverts to a (below) ‘Mask’ Icon. (Item 2)
So if you tend to get click happy, you always have a visual clue as to what portion of the layer you are working on.
Active ‘Layer’ Thumbnail = Paint icon ![]()
Active ‘Layer Mask’ Thumbnail = Mask icon ![]()
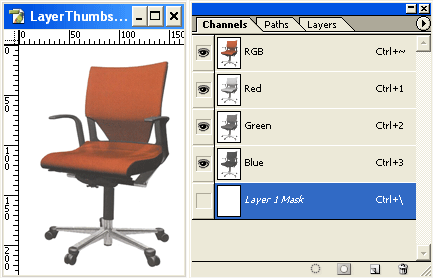
One important thing to remember about Masks in general, is that they are permanently stored in Channels, and the ‘Layer Mask’ Thumbnail acts as an edit able channel preview, just like the ‘Layer Thumbnail’ previews what you edit in the document window.
To show you what I mean. The moment you add your ‘Layer Mask’, switch to the ‘Channels’ Tab of the Layers Palette and notice the new ‘Layer 1 Mask’ at the bottom of the list. Any edits to this channel is reflected in the Layers Palette ‘Layer Mask’ Thumbnail and vise versa.
Armored with knowing that masks are stored in channels, the final and most important thing to understand, as already noted above, is that masks are grayscale.
To manipulate a mask you use the ‘Brush Tool (B)’ ![]() from the Toolbar (combined with Selection tools, if necessary), not to paint color, but to hide and reveal or isolate and protect portions of the layer.
from the Toolbar (combined with Selection tools, if necessary), not to paint color, but to hide and reveal or isolate and protect portions of the layer.
So areas painted black (#000000) are protected, and areas painted white (#ffffff) are editable.
Ultimately, the ‘Layer Mask’ allows you to manipulate the ‘Layer’ without actually destroying any of its pixel information.
Here are some Masking Examples
‘Powder Room’ Mask Magic
‘Powder Room’ mask is my way of saying, the same way a make-up artist brushes powder (or make-up, or body paint for that matter) onto the subject, the same applies in Photoshop.
Select/activate the ‘Layer Mask’ Thumbnail by clicking on it, make sure the Foreground Color is set to Black (Hit ‘X’ key) and lets ‘paint’ over the right arm of the chair to hide it. Revert the foreground color to white, and brush over that same area to bring it back.
Use Layer Mask to Knockout background.
This example image has a chair object with a solid white background. We can easily select the white background, inverse the selection to focus on the chair object, then hit the ‘Add Layer Mask’ ![]() icon located at the bottom of the Layers Palette to create the knockout.
icon located at the bottom of the Layers Palette to create the knockout.
Again, the objective is the same. You protect pixel information and simulataneously allow for further affects to the image as if the white background were totally erased.
Use Layer Mask to Blend Images.
Probalbly, the most popular use for A Layer Mask is to allow for seamless transition between two images. The way to achieve this transition is to apply a gradient with foreground to transparent set in place.
Other Notable Layer Mask Thumbnail Tips
1. Ctrl + click (Mac:Command + click) on the Layer Mask Thumbnail to edit directly. This is equivelent to switching to the Channels Palette and making edits to the corresponding alpha channel.
Ctrl + click (Mac:Command + click) on the Layer Mask Thumbnail again to revert back to non-edit mode.
2. Alt + Shift or (Mac: Option + Shift) , and click the layer mask thumbnail to view the mask on top of the layer in a rubylith masking color. Repeat to turn off the color display.
3. You can copy contents of a Layer directly into the Layer Mask.
4. In ImageReady you can DUPLICATE the Layer Mask by Alt + dragging (Mac: Option-dragging) it to a new Layer.
5. Select the Layer Mask and apply vaious filters for other modifications.
6. To make the layer partially visible, paint the mask with gray. (Gray is any other color than Black or White)
7. Right – click the Layer Mask for ‘Discard/Apply/Disable Layer Mask’ options.