Here’s a little often used ‘Filter’ that can be quite useful in creating kaleidoscope (tile) Patterns.
Lets begin this tutorial directly inside ImageReady.
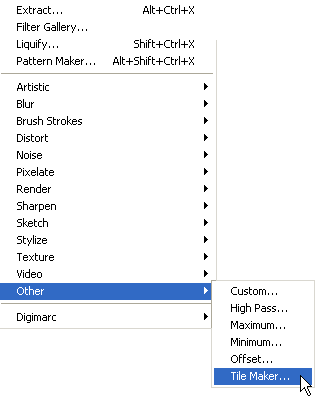
First off, let’s point out where to find this Filter.
In order to enable any of the Filter Options, create a new document with a preset of your choice.
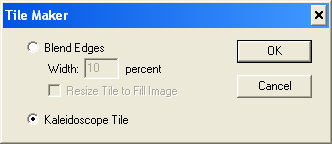
Then go to the ‘Filter/Other/Tile Maker…’ command option, and the second feature at the bottom allows for the creation of Kaleidoscope Tile Patterns. (As captured below) (First introduced in ver 7 of Photoshop/ImageReady)
Before using this little gem, just a few notes on how to use it.
The Tile Maker, like Photoshop’s ‘Pattern Maker’ works best on a selected area of an image and is useful in creating tiled background. (In a graphic work or as a background to a web page.)
Though, unlike the ‘Pattern Maker’, there’s little flexibility (close to none) with the filter controls. So a nice looking tile will often happen by accident or you must prepare in advance, your image, and then perform the tile operation.
You can also perform the filter to a whole image composite, or a photo. While on certain photos (usually a hit or miss) this produces some interesting effects. The only problem with that is, if you decide to apply the filter again, your not going to see any change, because you’ve tiled the whole composite or photo.
Let’s explore a few options in using this filter.
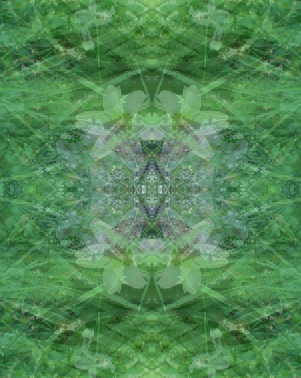
On a Photo:Download original image here.
So with your image, open it into ImageReady, and apply the above ‘Filter/Other/Tile Maker’ with Kaleidoscope option selected.
This will produce the below result.
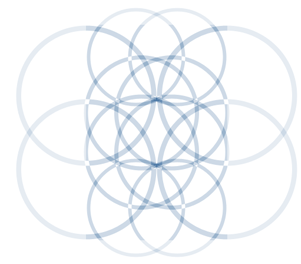
Confine an area to a selection and then apply the filter, also produces interesting results. (You can then invert your selection and delete any unwanted areas.)

You can also experiment with a single filter pass or combine multiple filters with CS Filter Gallery to produce interesting results.
Using the same selection as above, I apply a single ‘Filter/Stylized/Glowing Edges’…
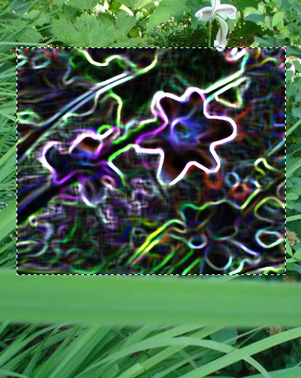
… to produce the below result.
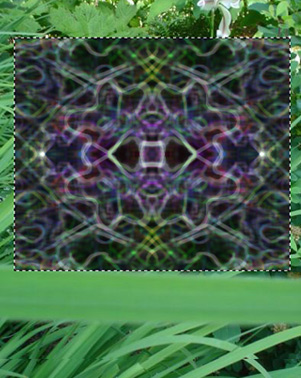
Again, its usually a hit and miss, pending on the photo and or any combination of applied filters.
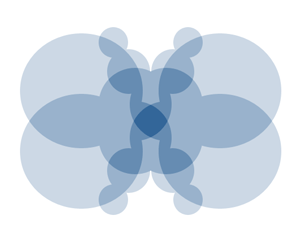
On Shapes
Applied to shapes or combinations of shapes (I used the ‘Fill Pixels’ Option Bar feature to avoid the rasterize layer message while applying the filter), on the default white background layer such as the below, also produces nice results. Below are a few before (left) and after (right) experiments.


Plenty of possibilities with photos, Photoshop native shapes and paint effects when the ImageReady ‘Tile Maker’ is applied. You can also save your tile results as ‘Pattern/Brush Sets’ directly under the ‘Edit’ menu command.
An alternative, and yet, manual method of this affect directly inside Photoshop (and without the additional above transparencies) is to duplicate the image (or shape) layer, then ‘Edit/Transform/Flip Horizontal’. Then alternate between the various Layer Blend Modes to see which provides the best tiled results.
As a final note, though, follow through at your own risk. That is, the ‘Tile Maker’ plug-in for ImageReady should be located in the or similar location as this ..Plug-InsAdobe ImageReady OnlyFilters folder. I simply copied the TileMaker.8bf file into the ..Plug-InsFilters folder (the same folder that contains Average/Clouds/Half Tone, etc) and when Photoshop is restarted, the ‘Tile Maker’ plug-in now appears under ‘Filter/Other/Tile Maker…’. (As shown below)
Hope this and other pointers in this tutorial have been helpful to you.