Here’s a few steps to simulate simple to complex remote rollovers in the new ImageReady CS.
The basic premise behind remote rollovers is the simple fact that it enables you to reveal or hide another slices’ content within your layout.
To incorporate the remote rollover effect involves the basic use of rollovers. So to begin this tutorial, I have prepared a starter file for you to download a follow along. Download the File here. (Requires Winzip)
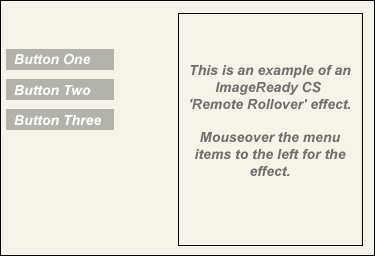
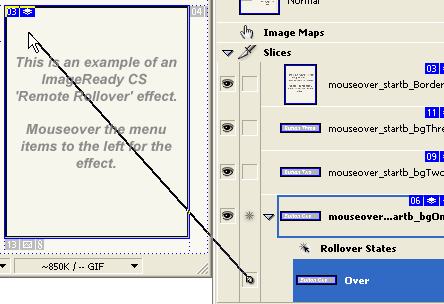
The basis of the download sample is captured below. A simple three button menu area with a another area (that I have boxed in with text), that will represent the target slice for the remote rollover.
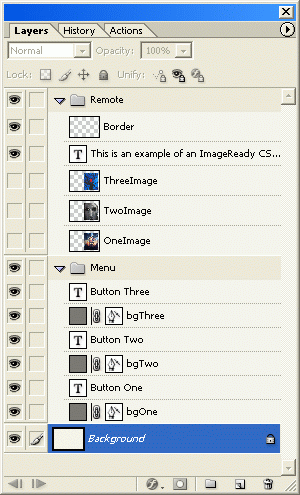
As in the screen shot above, all content must be prepared and to make effective remote rollovers you will have to have content available in a hidden state. As I have captured below, the ‘Layers Palette’ contains multiple layers grouped by set. The current document represents the original or ‘Normal’ state. (In my case, the only alteration is that some layers are hidden)
To make an effective remote rollover, we first need Slices’ in our document. So go to ‘Window/Web Content’, if its not open already and position it alongside the ‘Layers Palette’ and your document preview window for easy management.
View a screen shot of my layout here.
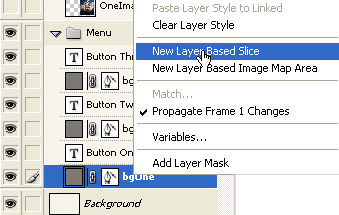
So begin by selecting the ‘bgOne’ background layer (inside ‘Set’ entitled ‘Menu’) at the bottom of the ‘Layers Palette’, then right-click on that layer (Mac: Control + click) and from the context menu choose ‘Make Layer Based Slice’. (As I have captured below)
Alternatively: ‘Layer/New Layer Based Slice’
Some visual notices when you add a Slice to your layout.
View a screen shot here.
bgOne content is completely encased by a Slice with an auto generated slice number in order of the preceding ‘Auto Slices’ created by Photoshop. (Auto Slices are the light grey ones)
bgOne Layer now has the ‘Slice’ icon attached to it.
The Slice is updated here also with an associated slice name auto generated according to the parameters in the ‘Edit/Preferences/Slices’ panel.
Next, repeat the above ‘New Layer Based Slice’ procedure for both the ‘bgTwo’ and ‘bgThree’ Layers. The same visual notices should appear for those respective Layers also. (As captured in the following link)
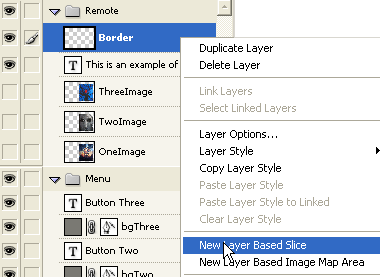
The final slice will be set on the (in this case) the ‘Border’ Layer, in the ‘Remote’ Layer Set. So repeat the above process.
This slice will act as the remote target once any of the menu items are moused over. Right now, the ‘Normal’ state just has the text content, but as you can see in the above screen shot I have three image content layers in a hidden state that will be used for each of the three menu items.
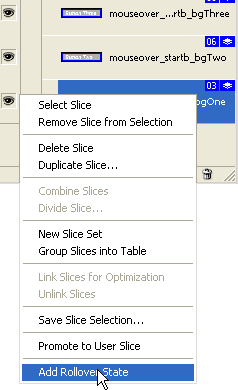
Next, go directly to the ‘Web Content’ Palette and activate (select) slice ‘bgOne’. Right click (Mac: Control + click) and choose ‘Add Rollover State’, as I have captured below.
This will add the Over state to the web content palette as I have captured below.
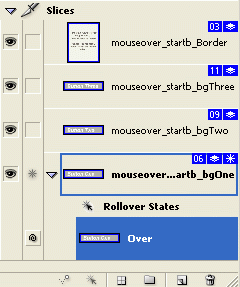
Now lets add the remote slice effect to this over state.
Just to the right of this ‘Over’ state is whats called a Pickwhip icon ![]() , click on it, drag and drop it onto the ‘Border’ slice target we created earlier. (At the top of the Web Content Palette)(As I have captured below)
, click on it, drag and drop it onto the ‘Border’ slice target we created earlier. (At the top of the Web Content Palette)(As I have captured below)
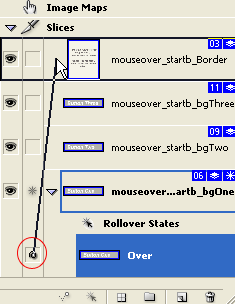
Alternatively, click on the pickwhip, drag and drop it onto the same ‘Border’ slice area in the preview window as I have captured below.
The slice is now updated and is que’d with a remote slice.
How do you know for sure? Again, there are some visual indicators, both in the Preview Window and the Web Content As I have captured in the link below.
Both the Preview and Web Content Palette indicate the trigger slice with a new slice badge called a Trigger badge icon (1) ![]() , and the target slice is indicated by a Remote badge (2)
, and the target slice is indicated by a Remote badge (2) ![]() .
.
Finally, we need to set the buttons ‘Over’ state remote target ‘Border’ slice to the corresponding (currently) hidden image layers.
Select the ‘Over’ state for the ‘mouseover_startb_bgOne’ slice, then move over to the ‘Layers Palette’, click the eye next to the ‘This is an example…’ text layer to hide it, and click the empty box next to the ‘OneImage’ Layer to make it visible.
Repeat the process for the other two ‘Over’ states (mouseover_startb_bgTwo & mouseover_startb_bgThree).
Now that all slices are intact, complete with a trigger and target remote slice for the corresponding menu items, select the ‘Preview Document (Y)’ ![]() button on your Toolbar, to render a live preview within ImageReady.
button on your Toolbar, to render a live preview within ImageReady.
Or you can choose,’File/Preview In.’DefaultBrowserName’ (Ctrl + Alt + P).
Finally, ‘File/Save Optimized As’ to save your html output and associated image files result.
Note: When saving your final output, ensure that the active layer is in the ‘Normal’ state.
Summary:
1. Prepare Layered content in your document.
2. Assign Layer Based Slices to the the appropriate Layers.
3. Create ‘Over’ state for the menu/button items
4. Set the ‘Trigger’ and ‘Remote’ attributes per ‘Over’ state.
4. Save .psd & Save Optimized As, for html output.
CLick Here to preview my final result.
Download final .psd version here.