Here’s a simple style effect to create a Christmas tree ornament combing ‘Shape Tool’, Blending Styles and an Christmas motif image.
Create a new document (File > New) preset of your choice with a background color other than white. (I used grey variation).
Step 1: Activate Tool and set Foreground Color.
- Set the Foreground Color swatch to White (#ffffff).
- Click the ‘Ellipse Tool (U)’ from the Toolbar, as I have captured below.
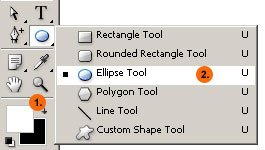
- Activate Shape Layers icon command for the currently selected Ellipse Shape Tool (U).
- Select the Geometry Options drop down arrow.
- Then set the Fixed Size property to 250 x 250, as captured below.
Note: For exact replication of the remaining tutorial, Fixed Size is used. So if you decide to use a different size shape, your remaining Blending Styles will vary.
- Then click once inside then document to create the fixed size shape, as captured below. Then in the Layers Palette rename ‘Shape 1’ to something userfriendly, like ‘Ornament’.
Note: The grey area represents an alternate background layer (Color Fill 1), to separate the Shape from a normally White background.
Step 3: Add Blending Styles.
- From the Layers Palette, right click (Mac:Control + Click) the ‘Ornament’ layer and from the context list choose Blending Options as I have captured below.
- From the Blending Styles Control Panel, tick and select (optional) the Drop Shadow and set it’s properties as I have captured below.
- Next, tick and select the Inner Shadow Style using Blend Mode color of #CFC8C8 and set the opther options as captured below.

- Next, tick and select the Inner Glow Style and set it’s properties to what I have captured below. (I used color #D8D5FC)
- Then tick and select the Bevel and Emboss style and set the following properties as captured below.
Then set the Bevel and Emboss/Contour substyle as captured in the last picture (lower right).
Once all styles are set, click OK to commit.
- And you should have a simple ornament looking effect as I have captured below.
Step 4: Add Top Piece.
Activate the ‘Pen Tool (P)’ with Shape Layers Options Bar feature enabled and drew a small ‘hanger’ piece, as captured below.
Place the ‘hanger’ top piece layer below the ornament layer in the layer stack.
I then used the same style (right click, ‘Copy Layer Style’ from ornament) and right again to ‘Paste Layer Style’ unto this one. (Right click again on this style to ‘Scale Layer Effects’ to suit the color scheme of the overall ornament.) 
Next, I added a simple ring layer as captured below.
Step 5: Add/Place Picture.
For a real ornate effect, I then copied a picture of a snowman from the web and scaled into position in the centre of the ornament. (This snowman picture is now the uppermost layer in the Layers Palette)

And as a final touch I add a frosted snow effect behind the snowman picture layer using the color white, brushed on, Filter/Blurred and a reduced Opacity level of 62%.
Here is the final result.