Here’s a tutorial introducing the basics of utilizing Adobe ImageReady’s Animation tool.
Lets begin this tutorial directly inside Photoshop.
First, run Adobe ImageReady , start a new document, I used a small preset of 300×250.
Note: If you already have Photoshop open, then simply create the new document, and hit the ‘Edit in ImageReady’ button on the bottom of the Toolbar.)
First things first, lets arrange the ImageReady Workspace area to one that will allow for easy access to the appropriate tools.
If not already in view, go ‘Window/Layers’ and ‘Window/Animation’ and hide the rest. (with exception to Tools & Options from the Window menu command list)
Then, create a new empty Layer (Shift + Ctrl + N (Mac: Shift + Command + N)), which should default to ‘Layer 1’, just above the default document background Layer.
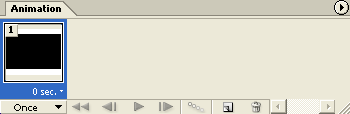
Next, hit the D key on your keyboard to set the ‘Foreground Color’ to Black, then select the ‘Rectangle Tool (U)’ ![]() on the Toolbar and click and drag to draw a black rectangle as I have captured below in the Animation preview window.
on the Toolbar and click and drag to draw a black rectangle as I have captured below in the Animation preview window.
Note: This layer will remain constant, and is used just as a backdrop for the text animation to come.
Just a few pointers with the Animation Palette before moving on.
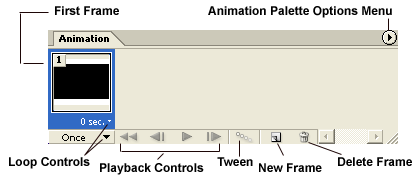
First Frame: Contains all active elements of your document, and remains constant until changes are made.
Loop Controls: Specifies time delay bewteen frames as well as a loop control command ranging from ‘Once/Forever/Other’.
Playback Controls: First Frame | Previous Frame | Play (Stop) | Next Frame playback controls.
Note: Theres a ‘Previous|Forward’ playback controls also on the lower left of the ‘Layers Palette’ and is activated/enabled when two or more Frames exist in an animation.
Tween: Allows for smooth transitions ‘In Between’ frames that you specify.
New Frame: Add a new frame to the existing animation with applied new affects.
Delete Frame: Delete a selected frame from the existing animation.
Animation Palette Options: A list of further options to configure the palette and your animation.
Selecting Frames within the Animation Palette is as common a task as in most applications.
Things to note:
For ease of use with ImageReady animations, it’s best to have all additional layers (containing additional animation elemnts) and affects prepared before creating additional frames.
These multiple elements (layers) will help simulate a smooth transition or motion, by simply toggling the Visibility, Opacity Level and Layer position within your document.
Now back to the animation, lets add some layered elements that will make up the altered frame states.
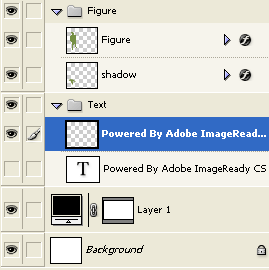
I’ve created a Layer Set and within the set, I’ve added a Text Layer ‘Powered by ImageReady CS’, and a custom pixel shape ‘Figure’ and its ‘shadow’ layer.
Download this ‘Figure’ layer separately if you choose to use them in this animation exercise.
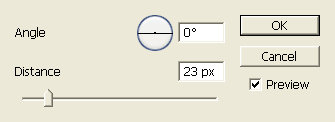
For an added effect, lets duplicate the ‘Powered by..’ type layer, select it then apply a ‘Filter/Blur/Motion Blur’ setting that I have captured below.
So that now the Layers Palette should appear as below. 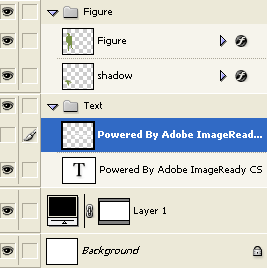
Now that all the elements are in place, lets apply the criteria that I mentioned in the above Notes section. The criteria upon which ImageReady animations are based, and they are Visibility, Opacity and Positioning.
So, lets begin with positioning the elements in place.
The ‘Figure Set’ is fine where it is. But lets place the ‘Powered by Adobe ImageReady…’ rastered/motioned blured layer off screen to the far right, ready for use in frame two of the animation. (Note: This text layer will slide from right to the center position with a slight fade in affect)
Also, lets turn off visibility of the original Type layer ‘Powered by Adobe…’ layer.
Also, reduce the Opacity of the ‘Figure’ Set to around 35%.
Here is what the document window should look like.
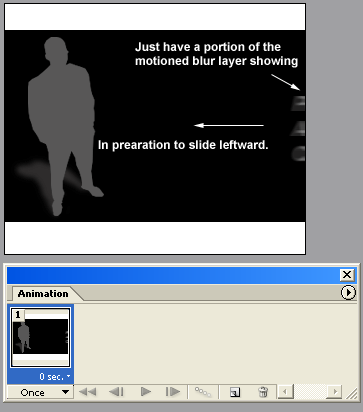
Hope your still with me. Lets, now add a new frame, but clicking on the ‘Duplicates Current Frame’ button on the Animation Palette. With that Frame (2) selected, activate the blurred type layer, and with the ‘Move Tool (V)’ click and drag to the postion that I have captured below.
Also, select the ‘Figure Set’ and adjust the Opacity Level of that set to 48%.
Here is the full document view of that last step.
Here is Animation Palette preview.

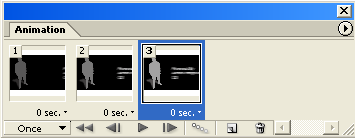
Again, duplicate the current Frame (3), and repeat the above process of activate, move the blurred layer and increase the Opacity of the ‘Figure Set’. (I used 65%)
Here is Animation Palette preview.
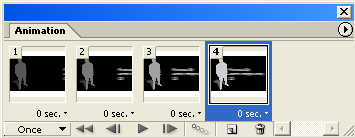
Again, duplicate the current Frame (4), and repeat the above process of activate, move the blurred layer and increase the opacity of the ‘Figure Set’. (I used 82%)
Here is the full document view of that last step.
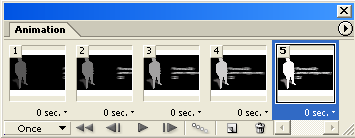
Here is Animation Palette preview.
Again, duplicate the current Frame (5), the blurred type layer is already into final position, but reduce that layers opacity to 75%. (Ready to fade out of the animation altogether)
Turn visibility of the original ‘Powered by Adobe…’ type layer and bump up the Opacity to about 38%. (Preparation to fade into full view for the final frame.)
Select the ‘Figure Set’ and bump its Opacity up to 100% so that its now in full view.
Here is the full document view of that last step.
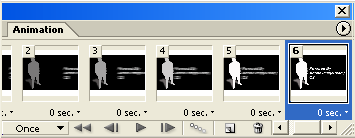
Here is Animation Palette preview.
Finally, duplicate the current Frame (6), reduce the blurred type layer layers opacity to 0%. (No longer visible on screen)
‘Powered by Adobe…’ type layer bump the Opacity to about 100%.
Here is the full document view of that last step.
Here is Animation Palette preview.
Now we have a complete six frame animation. As you can see from the Animation Preview shots above, frame 1 started with a constant state of all current elements we had prepared in the document. The remaining five frames individually contains an altered state of one or more of those static elements to simulate the effect of motion.
As a final step, make sure you save this file as a native .psd file. (File/Save) Then select the Animation Palette Options Menu button and from the list choose ‘Optimize Animation…’. At the next prompt select both ‘Bounding Box’ & ‘Redundant Pixel Removal’ options, then hit OK.
Finally, choose ‘Save Optimized As’, to save your animation as a .gif file.
I added a replay button to the animation for easy playback. (That will be a future tutorial)