1. Select the Shape Tool option (Press the letter U on the keyboard). Hold the mouse click and the drop down option reveals six different Shape options.
2. Once you have selected a basic Shape tool, at the very top of Photoshop’s menu area, a new ‘Options Bar’ appears.(As I have captured to the right)
But i will only focus on the area I have in Blue Outline.

3. Start by Selecting a ‘Shape Tool’ and click & drag (Hold Shift key to Constrain size to proportion) to draw onto the document. Repeat for each one as I have done.
Let’s start with the ‘Square Shape Tool’.
Helpful Tips: Easy Selections
*Hold the Control Key and Click the Rectangle Shape to auto select.
*  Use the ‘Direct Selection Tool (A)’ to select it.
*Or turn on Photoshop’s ‘Auto Select’ Feature.

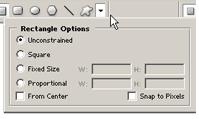
4. ‘Rectangle Shape Tool’
Select the ‘Rectangle Shape Tool’ from the Toolbar & then select the ‘Geometry Options’ arrow on the Options bar as I have shown.
As you can see you have five size/proportion control options for the basic Rectangle Shape.
Default Option is ‘Unconstrained’.
Test the different options on a new Rectangle Shape to see what they can do for you.
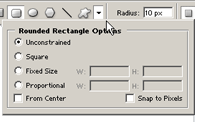
5. ‘Rounded Rectangle Shape Tool’
Select the ‘Rounded Rectangle Shape Tool’ from the Toolbar & then select the ‘Geometry Options’ arrow on the Options bar as I have shown.
As you can see you have five size/proportion control options for the basic Rounded Rectangle Shape.
Default Option is ‘Unconstrained’.
Test the different options on a new Rounded Rectangle Shape to see what they can do for you.
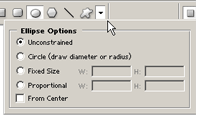
6. ‘Ellipse Shape Tool’
Select the ‘Ellipse Shape Tool’ from the Toolbar & then select the ‘Geometry Options’ arrow on the Options bar as I have shown.
As you can see you have five size/proportion control options for the basic Ellipse Shape.
Default Option is ‘Unconstrained’.
Test the different options on a new Ellipse Shape to see what they can do for you.
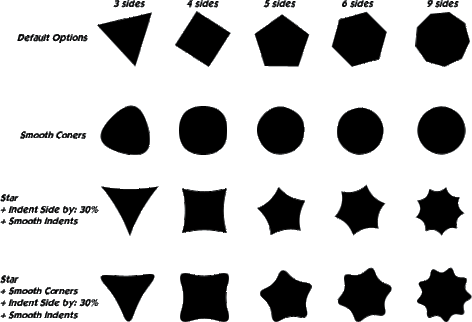
7. ‘Polygon Shape Tool’
Select the ‘Polygon Shape Tool’ from the Toolbar & then select the ‘Geometry Options’ arrow on the Options bar as I have shown.
This Shape has different features than the previous ones I mentioned.
Notice theres a ‘Sides’ Option field box on the Options Bar now. The default side for a Polygon is five(5).
The min/max integer value is between 3/100. Any integer above/below the allowed value, Photoshop will round in off to that nearest value.
If you use the ‘Radius’ feature its measured in inches & is equivelant to the fixed size options as in the previous shapes.
Test the different options on a new Polygon Shape to see what they can do for you.
The ‘Star’ option is a neat feature. Below are some samples of what it can make.

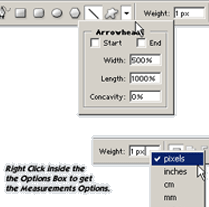
8. ‘Line Shape Tool’
Select the ‘Line Shape Tool’ from the Toolbar & then select the ‘Geometry Options’ arrow on the Options bar as I have shown.
This Shape has different features than the previous ones I mentioned.
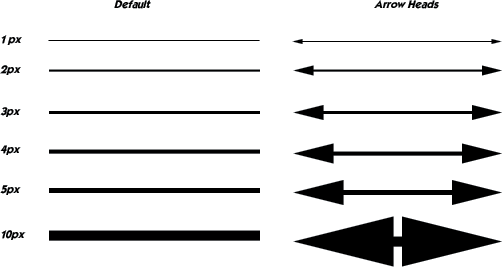
Notice theres a ‘Weight’ Option field box on the Options Bar now. The default weight for a Line is one(1 px).
Test the different options on a new Line Shape to see what they can do for you.
The ‘Arrow Heads’ option is a neat feature. Below are some samples of what it can make.
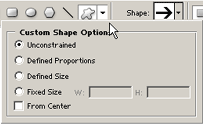
9. ‘Custom Shape Tool’
Select the ‘Custom Shape Tool’ from the Toolbar & then select the ‘Geometry Options’ arrow on the Options bar as I have shown.
As you can see you have five size/proportion control options for the basic Custom Shape as from previous Shape Tools.
Default Option is ‘Unconstrained’.
Test the different options on a new Custom Shape to see what they can do for you.
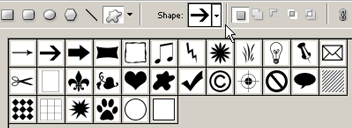
Notice there is also a new ‘Shape Palette’ bar added to the Options Bar.
Phoroshop comes with a predefined Shape Set located in your ‘Program FilesAdobe Photoshop 7.0PresetsCustom Shapes’ folder.
10. ‘Custom Shape Palette’
Select the arrow options menu from the Custom Shape Palette to reveal the available list of predefined shapes.
Double click on any of the predefined Custom Shapes to select and close the Custom Sahpes Palette, then click & drag (+ hold the Shift Key, to constrain) that Shape onto your document.
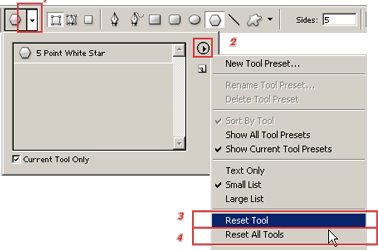
11. ‘Reset’
At any time you find your working an a graphic and you go to use any of the Shape Tools and things are not the way they were when you installed Photoshop, then heres what to do…
As I have captured in the image, for any Tool Bar tool there is a reset to default option.
Follow the 1-2-3-(Optional 4) steps to Reset that Particular Tool or Rest all Tools.