Here’s a few simple steps to help make your web layouts XHTML (The Extensible HyperText Markup Language) Transitional compliant.
For more information on these xhtml web standard consult W3C Recommendations for further information.
To begin this process without embarking on the making of a full layout. Lets open up ImageReady CS, start a new document of any preset size.
Next, go ‘Window/Actions’ to bring the Actions Palette to the foreground, if it isn’t already.
Now, create a simple layout from a ‘Make Website’ action preset from the actions list.
Activate the ‘Make Website’ then hit the ‘Play’ action playback button on the bottom of the Actions Palette, as I have captured below.
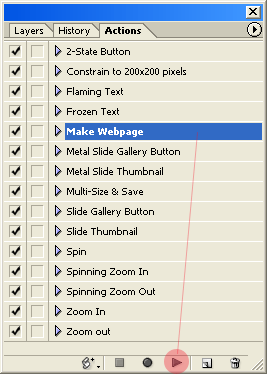
Note:Make sure you have a blank document open as mentioned earlier, otherwise you will be prompted with a serious of error messages related to the action.(Which requires to be run on an active document)
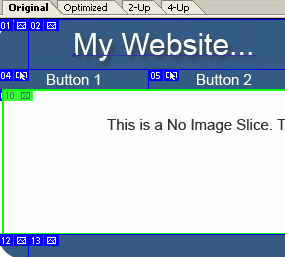
Once the ‘Make Website’ action is finished, you should have a document like the capture below.
 Click above image for a larger view!
Click above image for a larger view!
This action creates a ready made layout design, complete with 2-state roll-over navigational buttons and with slices. (As indicated by the blue/green border areas)
An Important Note with this template to be aware of is that once you ‘Save Optimized As’ to generate the html file for the browser, this template generates not only one html file, but 6 html files. One for the ‘File Name’ preference you give it in the ‘Save Optimized As’ dialog box. The remaining 5 html files are automatically created for each button navigational item. This is a preference item that has to be set before you go to the ‘Save Optimized As’ command feature.
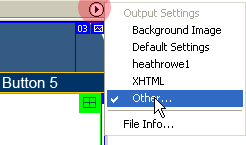
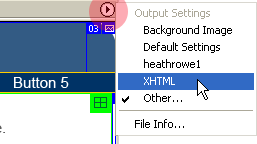
To locate this preference, go to the far upper right of the ‘Optimized View’ document window, and click the ‘Output Settings’ menu button (Highlighted in Red below), and from the list choose ‘Other’. (Notice I have my own output settings in the list ‘heathrowe1’)
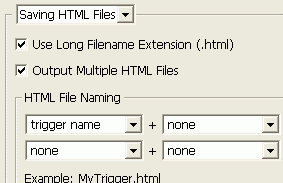
Hit the ‘Next’ button on the right to go to the ‘Saving Html Files’ preference (As captured below), and the option to ‘Output Multiple Files’ is what produces the above extra navigational bottoms on the fly. Note: Untick the ‘Use Long Filename extension (*.html) will generate just the three letter .htm file name extension on output.
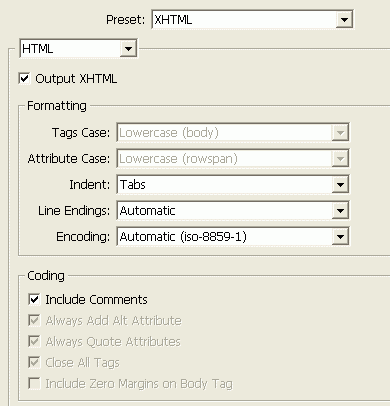
Selecting this will only activate it. So you have to go back to the ‘Output Settings’ menu command and choose ‘Other’ from the list and you will be taken automatically to the ‘XHTML’ output settings preference. (As I have captured below)
Now with this feature active, the next time you go to ‘Save Optimized As’, ImageReady will include these xhtml transitional compliant elements into the .html pages of the above template.
For further explanation on the guidelines inherent to xhtml transitional consult the above W3C link at the top of this page.
For items pertinent to ImageReady output settings, they include:
- Tags Case:
- Attribute Case:
- Indent:
- Line Endings:
- Encoding:
- Always Add Alt Attribute:
- Always Quote Attributes:
- Close All Tags:
- Include Zero Margins on Body Tag:Any other further editing of the html files in your favorite editor will also have to meet those standards.
Note: Make sure to change the ‘Output Settings’ from ‘XHTML’ to default for future layouts that don’t require it.