Having done that, at anytime you have this tool active, toggle visibility of the ‘Paragraph Palette’ by pressing its ‘Options Bar’ icon. The great thing about using this icon, is that it brings up BOTH the Character & Paragraph Palettes at the same time, even if they are not tabbed under the same palette, they will show as individual Palettes.
Alternatively: The Character & Paragraph Palettes can be toggled individually via the ‘Window’ menu command.
Note: This icon appears when other Toolbar options are active, but only toggles the ‘Brushes Palette’ features for that particular tool. So this is the the only other tool that usues it exclusively for the Character/Paragraph Palettes.
Point Type: With the ‘Type Tool (T)’ active on the Toolbar, click anywhere on your document to indicate the insertion point of your text. Type in the text or paste it from the clipboard, and hit ‘Ctrl/Command + Enter/Return’ on the main keyboard to commit it.
I originally, typed in ‘Experimental combinations of Blending Styles can produce some interesting results.’, and as you can see, a draw back with using large text is that the Point Type carries off the document and stays on the same line. Thus requires manual breaks.

A workaround is to use the ‘Paragraph Type’ feature. To do so, simply activate the ‘Type Tool (T)’ on the Toolbar, then click and drag in a diagonal direction to create the size of ‘Paragraph Type’ area. (as captured below)
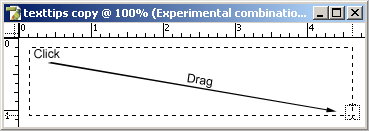
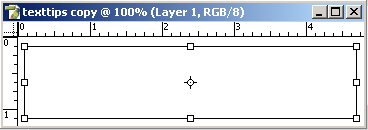
Once you let go after the click and drag process, you should see the ‘Paragraph Type’ with a blinking cursor at the insertion point as I have captured below.
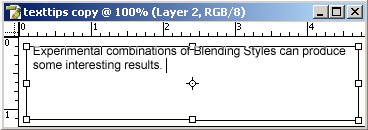
Then simply type or paste the required text and it will remain confined to the size of the bounding hollow transform handlers.
To finalize the type, hit the Commit icon ![]() up on the Options Bar.
up on the Options Bar.
Alternatively: Single click on the Type Layer Thumnail in the Layers Palette to commit the changes. Or simply, press ‘Ctrl + Enter’ on the main keyboard (Mac: Command + Return).
To cancel the current edit, hit the Cancel icon ![]() up on the Options Bar.
up on the Options Bar.
To convert a Point Type layer to Paragraph Type, with the ‘Type Tool (T)’ active on the Toolbar, right-click (Mac: Control click) on the type in the document to reveal the context menu items and choose ‘Convert to Paragraph Text.’
But just to show that click and Type with the ‘Type Tool (T)’ active is useful for single word or short phrases and click and drag and then type is useful for paragraph styles and formatting.
The simple workaround is to anti-alias your text layer, which lets you produce smooth-edged type by partially filling the edge pixels. As a result, the edges of the type blend into the background.
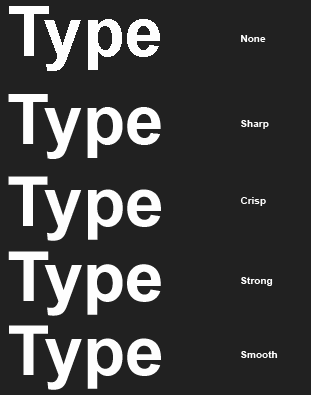
To do so, with the ‘Type Tool (T)’ active on the Toolbar, browse up to the Options Bar and next to the anti-alais icon is a drop down list for the anti-aliasing methods: None, Sharp, Crisp, Strong and Smooth. For smooth edges, depending on your design purpose just make sure the method is NOT set to None.
See the comparison examples below. The None method is clearly jaggied around the edges, while the others are relatively smooth, but also subtle.
Note: Ctrl + T (Mac: Command + T) to Free Transform a layer, or alternatively, go to the ‘Edit/Transform’ menu option.
To rasterize a Type Layer, simple right-click (Mac: Control + click) on the type layer in the Layers Palette, and from the context menu items choose ‘Rasterize Layer’ from the list. (Note: Text no longer is editable, so back up the layer if necessary)
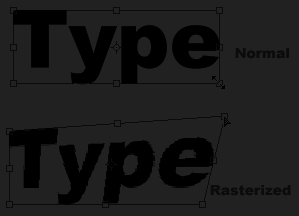
Rasterizeing a type layer may often be a necessary task in specific cases, but can still produce jagged results.
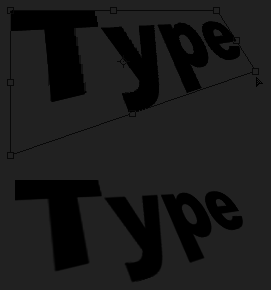
Below is an example. The top shot shows the transformation, while the bottom reveals the (committed transformation) results. Its, not too bad, but even at 72 dpi (Screen Mode), its noticibly jaggied at the edges.
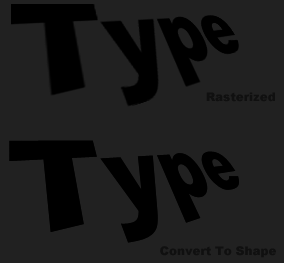
As a woraround, there is an option to ‘Convert Type to Shape’ found only under ‘Layer/Type/Convert To Shape’ main menu. Using the same transformations as I did with the above, I compared a Rasterized & Shape type layer. The Convert to Shape option offers the best smooth edges.
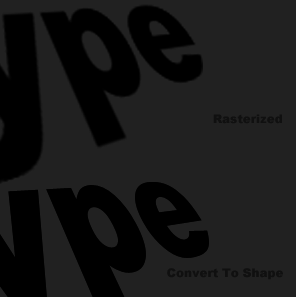
To provide another example, to really bring this point home: scale these two same samples upward, and the Convert to Shape type still retains its sharpness, while the Rasterized type degrades.
Here is a workaround to change this with just a few steps.
1. Link ![]() all your Text layers in the Layers Palette.
all your Text layers in the Layers Palette.
2. Simply, Hold down the ‘Shift key’ as you change any of the Type format features up on the Options Bar or within the Character Palette, and all Type Layers will be affected.
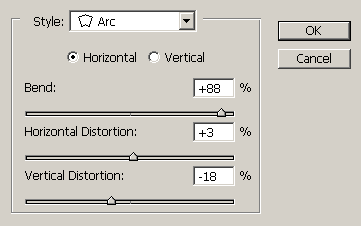
The first demonstrates a Arc text (using ‘Test of the System’) then, Converted to Shape (as described above) and then Free Transformed into position.Here is the Warp Settings


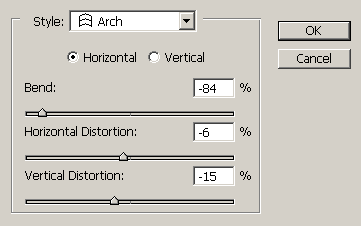
Here is the ‘Arch’ Warp settings:
Here is the result: (with Drop Shadow Blending Style)
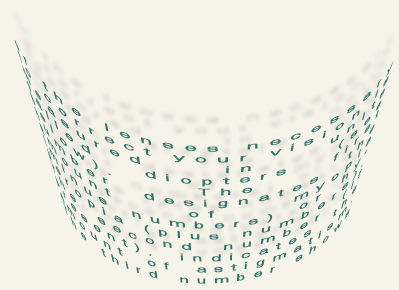
Again, these are just introductory demonstrations and surely there are plenty of uses for them.
Final note regarding the ‘Warp Text’ ![]() method, and that is if ever you no longer need the Warp Text on a particular Type Layer and want to revert it back to its original Point Type or Paragraph Type, simply highlight that ‘Warp Text’ Layer (indicated with
method, and that is if ever you no longer need the Warp Text on a particular Type Layer and want to revert it back to its original Point Type or Paragraph Type, simply highlight that ‘Warp Text’ Layer (indicated with ![]() ) and then click the ‘Warp Text’ icon
) and then click the ‘Warp Text’ icon ![]() up on the Options Bar to bring up the ‘Warp Text’ control panel, and in the ‘Style’ drop down list choose the uppermost option called ‘None’, then click ‘OK’ command to complete the conversion.
up on the Options Bar to bring up the ‘Warp Text’ control panel, and in the ‘Style’ drop down list choose the uppermost option called ‘None’, then click ‘OK’ command to complete the conversion.