1. Here’s a detailed look at how to achieve the Rings Around Text affect.
Some basic shapes, Layer Masks and a slight trickery within blending styles will help achieve this.
So follow along to see how.
2. Here’s the starting text I’ll be using. (‘Arial/Bold Italic/120 pt/Crisp’ settings)
Make sure there’s enough room around your document for the rings.

3. Next set a foreground color of your choice (I used ‘#F4990B’) then select the ‘Ellipse Tool (U)’ on the ‘Toolbar’, and draw in a shape as I have captured. (Once an ‘Ellipse’ is drawn in, ‘Ctrl+T’ to ‘Transform’, then right-click and choose ‘Distort’ to get it into position as I have drawn.)

4. Next, up on your ‘Options Bar’ select ‘Subtract From Shape Area (-)’ and draw in another shape inside the original.

5. To position, select the ‘Path Selection (A)’ tool on the ‘Toolbar’ and select that new (knockout) shape. Then as above. ‘Ctrl+T’ to ‘Transform’ then right-click and choose ‘Distort’ and position it as I have captured below.

6. Here’s what the ‘Layers Palette’ should look like at this point.

7. Next, duplicate your ‘Ring1’ layer and change it’s color by double clicking on the Color Thumbnail in the ‘Layers Palette’. (I used ‘#4151AF’)

8. Now, have the ‘Ring1’ copy layer selected, ‘Ctrl+T’ to ‘Transform’, right-click on the ‘Transform’ handlers and choose ‘Flip Horizontal’ so that your document should look like what I have captured below.

9. Next, to achieve the rings behind affect create a ‘Layer Mask’ for each of the ring shape layers by clicking on the ‘Layer Mask’ icon to the bottom of the ‘Layers Palette’.

10. Now, you should have two ‘Layer Masks’, one each embedded with in the Rings layers.(Indicated by a small white thumbnail in the middle.)

11. Hit the ‘D’ key on the keyboard to set the F’oreground Color’ to ‘Black’.

12. ‘Ctrl+click’ on the ‘Ring’ ‘Text’ layer in the ‘Layers Palette’ to select it in your document. (As indicated by the marquee around the text below)

13. With the Ring Text Layer still in selection mode, Select ‘Ring1’ shape layer (Orange One) in the ‘Layers Palette’ and with the ‘Brush Tool (B)’ paint (with black = hide with ‘Layer Masks’ / with white = reveals) the areas I have indicated below.

14. With the Ring Text Layer still in selection mode, Select ‘Ring1 copy’ shape layer (Blue One) in the ‘Layers Palette’ and again with the ‘Brush Tool (B)’ paint (with black = hide with ‘Layer Masks’ / with white = reveals) the areas I have indicated below.

15. ‘Ctrl+D’ to deselect and you should see what remains. However, as I have indicated there’s an area that remains to be cleaned that was outside the Ring text layer selection.

16. ‘Ctrl+click’ on the ‘Ring1’ shape layer (Orange) to make the selection active in your document, then select (single click) the ‘Ring1 copy’ layer, and again with the ‘Brush Tool (B)’ paint (hide) that exposed area.

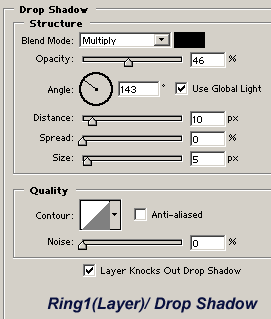
17. For added affect I’ll add a drop shadow to both ring layers as indicated below.
‘Ring1’ Drop Shadow Blending Style
18. ‘Ring1 copy’ Drop Shadow Blending Style

19. Again more problem areas.

20. For ‘Ring 1’ Layer go back into ‘Blending Styles’ and select the ‘Layer Mask Hides Effects’.

21. This didn’t fix everything, so apply the same trick to the ‘Ring1 copy’ layer.

22. ‘Ring1 copy’ layer.

23. This fixed the others but created a new problem area.

24. Repeat process as in step 16 to eliminate the problem shadow area.

24. Here’s the finished version.

Here’s a variation with an added shape…
