Utilize Photoshop (CS2 and above) Events Script Manager combined with a simple Action to automate stroking paths.
Create New Document
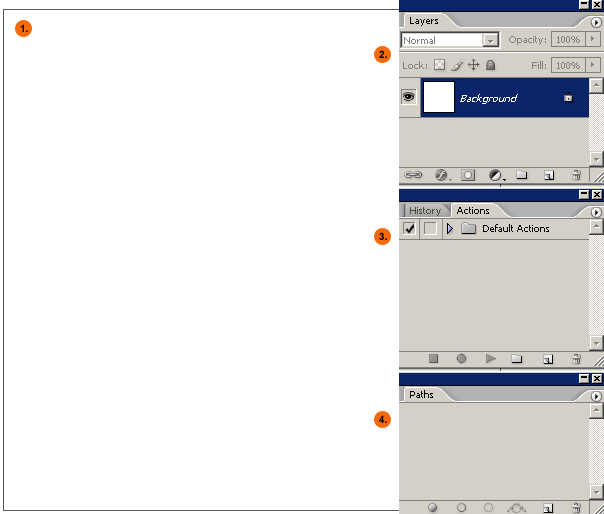
- Start with a File>New Document Preset of your choice. (I used 500×500/White Background)
- Go Window>Layers to bring the Layers Palette to the foreground.
- Go Window>Actions to bring the Actions Palette to the foreground.
- Go Window>Paths to bring the Paths Palette to the Foreground.
Note: If your Paths Palette is grouped with the Layers Palette, click the Path Tab and drag it out of the group so that it’s a free floating Palette as I have captured below (4).
Create Path
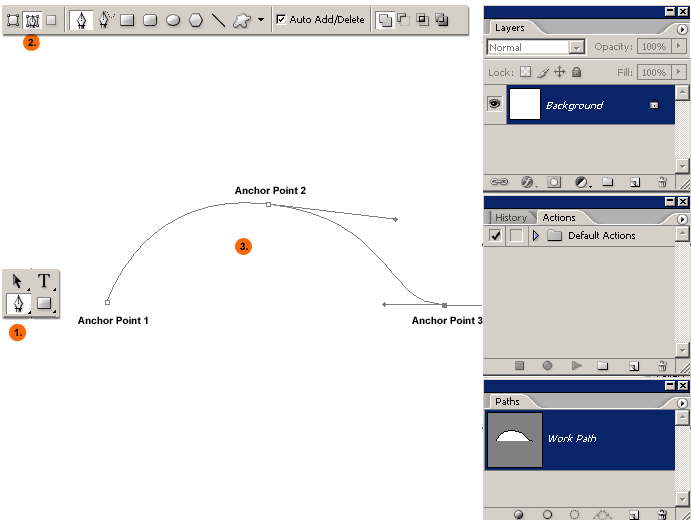
- Activate the Pen Tool (P) on the Toolbar.
- Select the Options Bar Paths feature for the active Pen Tool.
- Then click once to create the first Anchor Point, then click and drag to curve to the second Anchor Point and click and drag for the third Anchor Point.
Note: A two or three Anchor Point Path is fine. Details are not important.
You should also see the Work Path formation in the Paths Palette as well.
Convert Work Path to a Saved Path
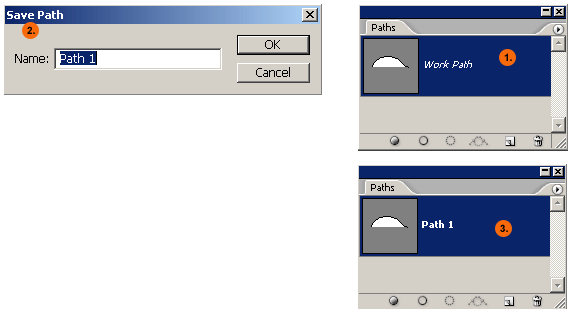
- Double click the Work Path Thumbnail in the Paths Palette.
- Accept the default New Path naming convention. Click OK to commit changes.
- The Work Path is now a saved ‘Path1‘.
Note: Work Path’s are temporary, any other path creation overwrites the previous one.
Select Brush Preset
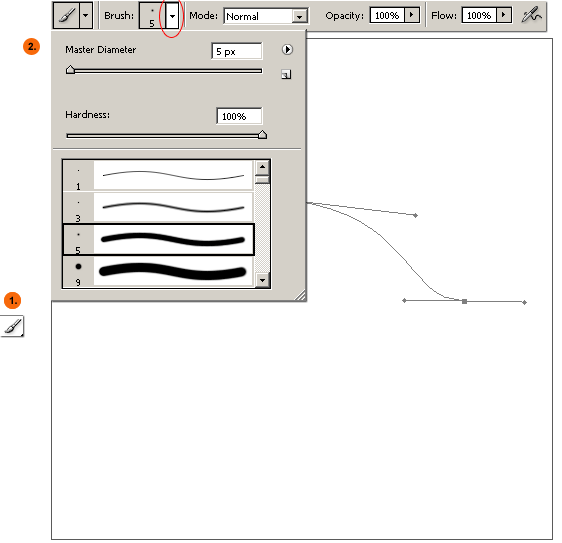
- Activate the Brush Tool (B) on the Toolbar.
- Select the Options Bar Brush Preset Picker (encircled in red below), then from the preset list select ‘Hard Round 5 pixels’.
Click once anywhere on the screen (or Return/Enter) to close the Brush Preset Picker.
Create Stroke Action Set
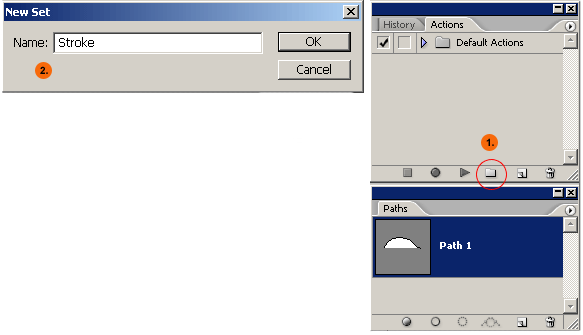
- Click the Create New Set folder icon (encircled in red below).
- Give the New Set a user friendly name – I used ‘Stroke’. The click OK to commit changes.
Create Action
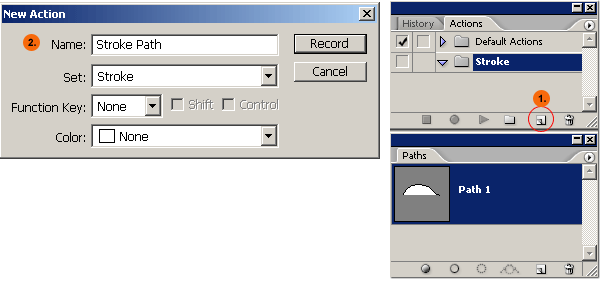
The above Create Action Set process now has the new ‘Stroke‘ set active in the Actions Palette.
- With ‘Stroke‘ Action Set active click the Create New Action icon (encircled in red below).
- Give the New Action a user friendly name – I used ‘Stroke Path’. The click OK to commit changes and begin recording.
Record Stroke Path Action
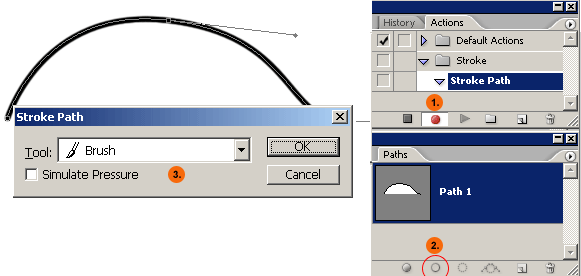
Stop Record Stroke Path Action
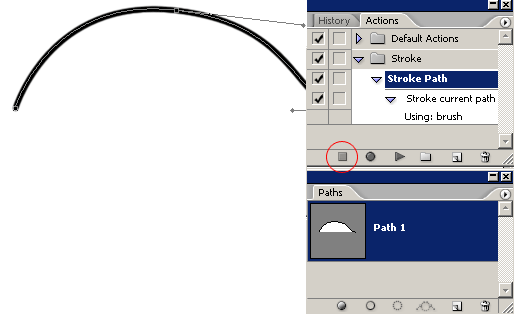
Click the Stop Record Action Playback icon command (encircled in red below) at the bottom of the Actions Palette. Now we have the action in place, organized into an Action Set called ‘Stroke‘, entitled ‘Stroke Path’.
Create Script Event
Now that we have the Stroke Action in place lets tie it to a Photoshop Event – Path Creation.
Close Photoshop.
Browse to the following Script Events Manager xml preference file on your hard drive, and open it in your favorite text editor.
To locate the Script Events Manager.xml on a PC:
‘DRIVELETTER:Documents and SettingsUSERPROFILEApplication DataAdobePhotoshop9.0Adobe Photoshop CS2 Settings’ folder
To locate the Script Events Manager.xml on a Mac:
‘UsersUSERPROFILELibraryPreferencesAdobe Photoshop CS2 SettingsAdobe Photoshop CS2 Settings’ folder
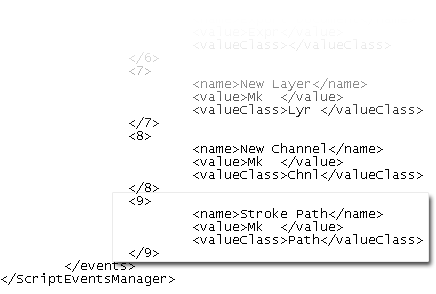
Once the xml preference file is open, create a new (successive) numbered entry (in my case – 9) exactly as I have captured below.
Note:
– The name node can be any descriptive title – I used ‘Stroke Path’.
– For the value node ensure there are two extra spaces after the Mk. (Shorthand for the four character ‘Make’.)
– The valueClass node also has to be a four character string – in this case ‘Path’.
Save and close the xml preference file.
Restart Photoshop. (It should remember the Layers, Actions and Paths Palette locations upon last use.)
File>New and create a new document, any preset size (as long as it’s large enough to contain drawn paths), Background of White.
Then go File>Scripts>Scripts Event Manager.
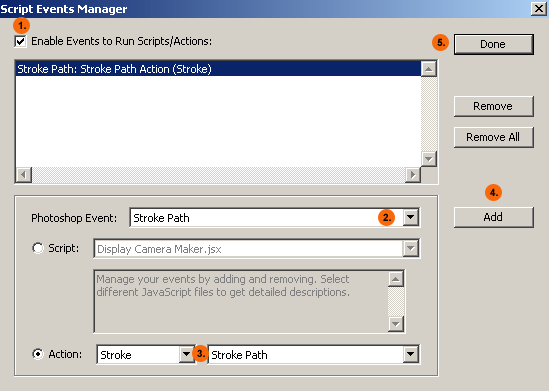
- Tick Enable Events to Run Scripts/Actions.
- Select Stroke Path ‘ Photoshop Event from the list. (This is the one we added in the xml preference file.)
- Enable Actions and select the Stroke Action Set from the first drop list, then the Stroke Path Action from that set.
- Click the Add command button and you will see it added to the top.
- Click the Done command.
Now we’re set up.
Select the Pen Tool (P), activate the Options Bar Paths feature.
When you complete your path, double click Working Path in the Paths Palette.
Photoshop will now detect an event (Make Path) and trigger the Stroke Action.
It may be a trivial task, but if you’re creating brushed line art it can save you time on the round trip of applying manual strokes. Also, now you have another Event (Mk Path) you can explore in combination with other actions.
Note: If you don’t need the Event anymore Disable it/or Remove Event via the File>Scripts>Scripts Event Manager dialog.
