A few simple vector layers to make compelling retro art, such as the one below

- Start with a new Solid Color Fill to represent the background sky.
A. Select the New Fill Layer icon and choose ‘Solid Color’ from the list.
B. In the ‘Pick a Solid Color’ Color Picker dialog set the color to #ece9a2, then click OK to commit changes.
C. The new Color Fill layer is apparent in the Layers Palette & is visible in the document view.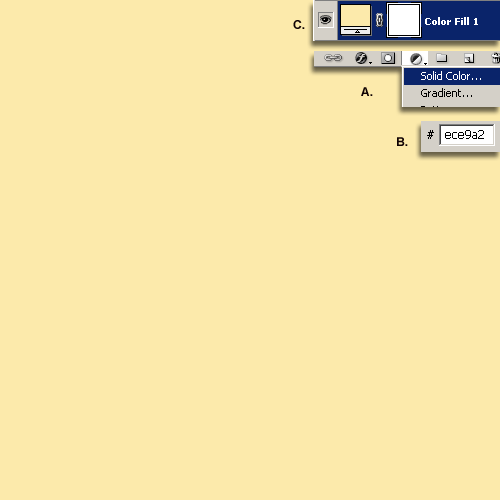
- Next add the grass areas:
A. Select the Pen Tool from the Toolbar.
B. Activate the Shape Layers on the Options Bar for the Pen Tool.
C. Set foreground swatch to a shade of green #009c4b. Then click to add anchor points until to you come full circle as I have in the lower case c area.
D. Set foreground swatch to a another shade of green #51bf86. Then click to add anchor points until to you come full circle as I have in the lower case d area.
This will give it a soft blur to the edge.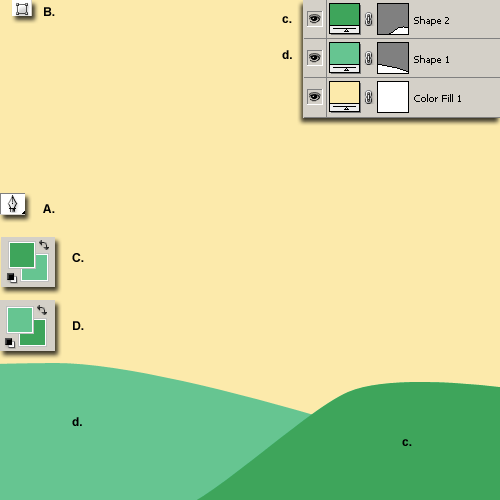
- Next add Custom Trees: Set the Foreground ColorSwatch to a brown color #77513d
A. Select the Custom Shape Tool, ensure Shape Layer Options bar feature is active.
B. Click the Drop arrow Shape Preset Picker and from the icon list choose the tree (encircled in red).
C. Click and drag (Hold Shift key to constrain proportions) to draw the shape to the left edge as I have captured nelow. Also this new shape should now be the upper most layer in the Palette.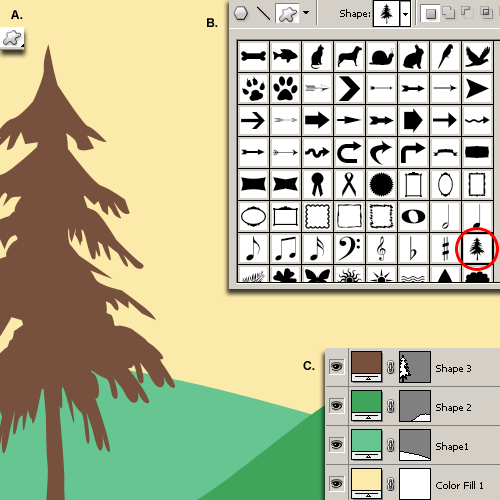
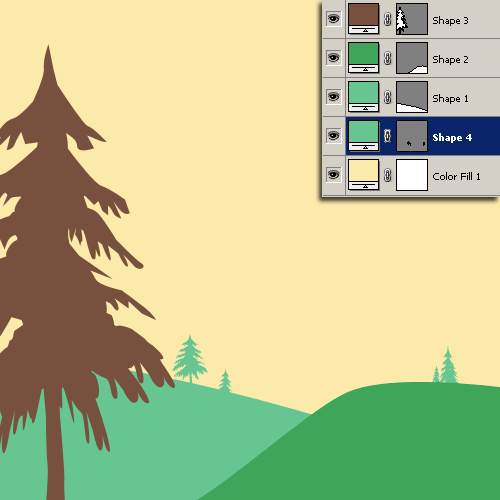
- Keep the previous Custom Shape Tool options, but change your Foreground Swatch Color to a green #51bf86 and draw a few smaller ones on the edge of the perceiving background areas, as captured below. Also, I dragged this new tree shapes below the two hill layer (Shape 1 & 2). Note: Hold the Shift Key to Add Multiple Shapes to the same Vector Mask Layer, as shown in Shape 4 Layer.
-
Next add Sun and Sun Rays
A. Select the Add New Fill Layer icon and choose Gradient from the list.
B. At the Gradient Fill Dialog CLICK the Gradient map preset.
C. At the Gradient Editor Dialog, create a Custom Gradient by setting the two end Colors (encircled in red below) two an orange variation. I used #fa8616.
Add varying Opacity Stops. The Black Symbol indicating 100%, while the White Symbol indicates 0% opacity.
Once complete, click OK to commit the Custom Gradient Editor.
D. Back to the Gradient Fill Dialog set the Style, Angle, Scale and other properties as captured, then Click OK to commit those changes. Note: Did you have difficulty creating that Custom Gradient in step C.I saved the preset for you.
1. Download SunRay Gradient Preset, reopen the Gradient Editor (step C above)
2. Click the ‘Load..’ command on the right and locate the preset you just downloaded
3. It should now appear as the last preset in your current set (entitled SunRay when you mouse over it). Click it to activate it. Then OK to get back to the Gradient Fill Dialog and continue with step D above.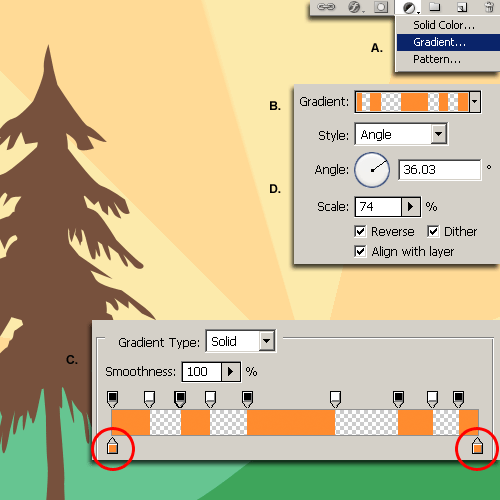
-
Position the new ‘Gradient Fill 1’ Layer as I have captured so that it appears behind all other layers except the background. Also, by default your Gradient will appear dead centre once created. Follow the below steps to reposition it in the main document.
Note: To position a Gradient:
1. Double click the ‘Gradient Fill 1′ Layer Thumbnail to open the ‘Gradient Fill’ dialog again.
2. Once that is open, Click and drag ON the document view to re-position.
3. Then click OK in the ‘Gradient Fill’ dialog to commit changes.
- Next:
A. Click the LAYER MASK thumbnail (encased in red) of this Gradient Fill Layer.
B. Select the Elliptical Marquee Tool.
C. Hold the Shift Key and click and drag to draw a small selection in the area where we want to position the sun.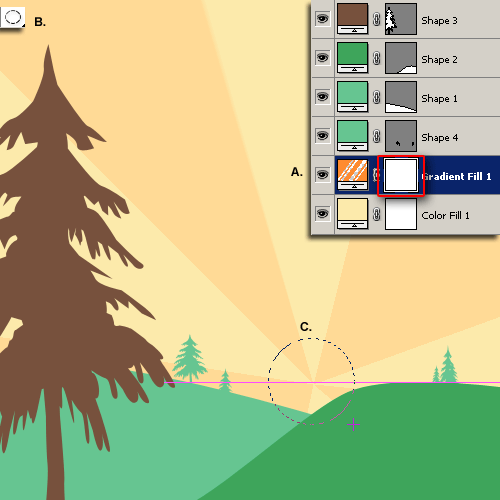
-
Finally:
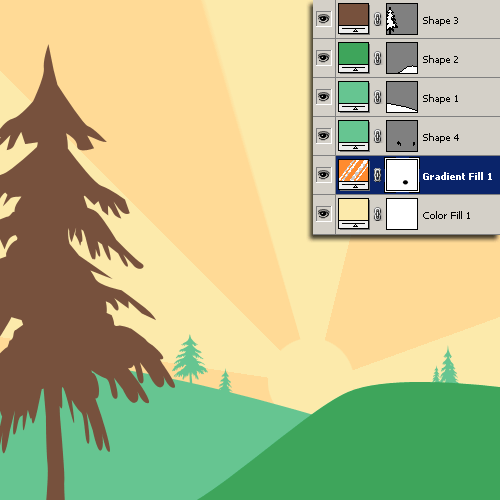
A. Hit the Shift + F5 keys to bring the Fill Command to the foreground.
B. Select ‘Use : Black’, then OK to commit changes.
C. Hit Ctrl + D (Mac: Command + D) to deselect.This will Knock a hole directly onto the Layer Mask in the area of our previous elliptical selection, allowing the underlying background color to show through, as captured below.
- Final touch:
A. Right Click on the Gradient Fill Layer and choose Blending Modes.
B. Set ‘Stroke’ parameters as captured. (Color: #f5a019)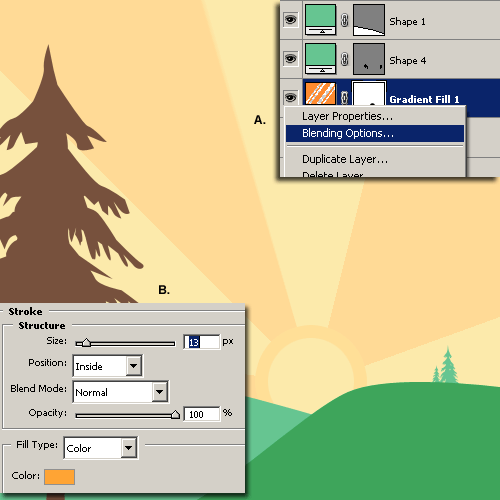
Note: All colors used in this tutorial are optional. Substitute them will your preferred colors.
